
Clarinet Left Hand Position
The correct clarinet left hand position will help you develop a faster, liquid, smooth technique. Technical efficiency in the fingers will help you create more musical passages. Note the word "fingers" and not wrist. One common fault in the left hand is to move the wrist to operate the A and G# throat tone keys.
CYBER MONDAY 2025 CLARINET DEALS
Get 5% off a CLARINET, MOUTHPIECES, REEDS OR EVEN NEW MUSIC CAREER TRAINING
This is a special Clarinet-Now.com code for a limited time: CHRISTOPHERJONE
Kal Opperman said, “Playing the clarinet is from the knuckles down.” If your left wrist rotates, you do not have ultimate efficiency in your fingers.
What is your goal here? Read through the following thoughts. Pay attention to the common faults listed below. Each thought below is explained more in depth with photos.
Now, go find a mirror and let’s clean up your left hand technique to make smoother and more musical passages. Clarinet Left Hand Position thoughts (see more below for descriptions and photos)
1. Hold a natural, relaxed curvature of the left hand.
2. Pads of fingers on tone holes (not tips).
3. Left thumb at 7:30 or 8 O’clock position (pointed at 1:30 or 2 O’clock position).
4. When not in use, the left thumb should hover over the thumb’s tone hole. The tip of thumb should touch the bottom tip of register key. Placing too much thumb on the register key is a common problem.
5. Watch your finger height (keep your fingers near their tone holes – do not wave at the audience while playing).
6. Hug the G# and A keys at all times (hug here means touching the keys, not pressing or squeezing the keys) with your left index finger. Make sure your left hand is not at a 90 degree position to the clarinet.
7. Home base for the left pinky is low E/long B key (test wrist rotation by fingering between low, left E; low, right F and low, left F#). This can also test your left hand index finger to make sure it is in place on the G# and A keys.
8. Do not look at your fingers while playing. When you learn a new note, develop the sense of touch and add it to your sense of hearing. Finger/ear coordination comes very naturally if you do this from the beginning. Also, looking down creates real embouchure problems and shows people that you do not know your clarinet fingerings.
9. Practice these left hand tips slowly. Make yourself aware of inefficient motion. Make your fingers smooth, but also try to achieve smooth tone quality by having a solid, stable embouchure.
Look at these Clarinet Left Hand Position thoughts more in depth with photos and short exercises below...
Clarinet Left Hand Position
Thoughts 1 through 9
How are you Doing?
Clarinet Left Hand Position Thought #1. Natural curvature of left hand.
The curve of the hand should feel natural.
Stand up for a moment. Let your left hand hang to the side of your body naturally. Relax. Take this feeling and slowly raise the left hand up to the clarinet.
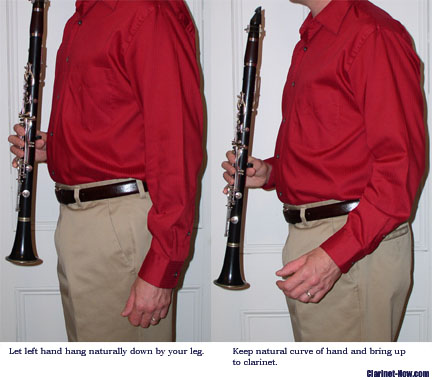
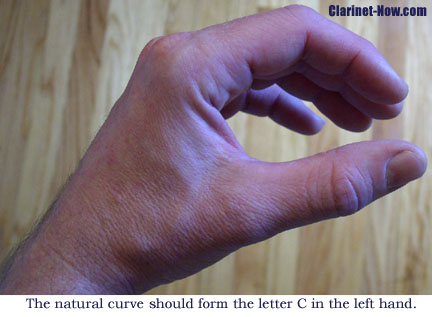
Take a look at the hand. Notice the natural curvature of your fingers. The fingers should form a C.
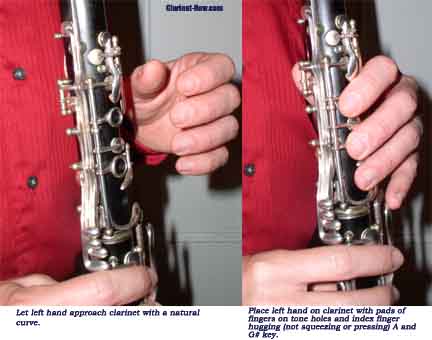
Place your fingers on or over your left hand tone holes. As you place your fingers over the tone holes, keep this natural, relaxed state. Notice I said “relaxed.” This is critical for musically-efficient left hand technique and can prevent any signs of overuse.
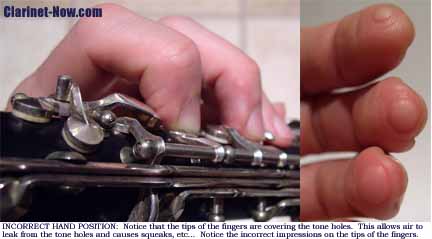
Clarinet Left Hand Position Thought #2. Pads of fingers on tone holes (not tips).
Often, many people have too much curvature of the hands and try to play with the tips of the fingers.
Maximize the use of the fingers by placing the finger pads on the tone holes.
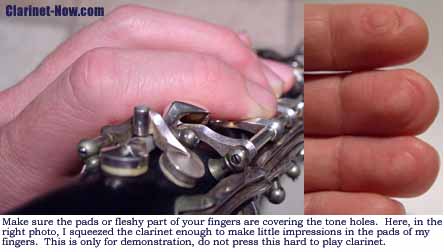
Test this by placing your left fingers on the tone holes and grip the clarinet slightly. After you’ve gripped it, look at your fingers.
You should see an indention of the tone holes in the fingers.
Are they on the tips or on the pads? Do you see a full tone hole?
If you see a full, round tone hole indention on the pads, you will seal the tone hole well.
If the indention is on the tip of your finger, you might not see a full round indention. Using the tips of your fingers to play clarinet will cause air leaks, squeaks and embouchure problems as you try to adjust the mouth to attempt to correct the wrong problem.
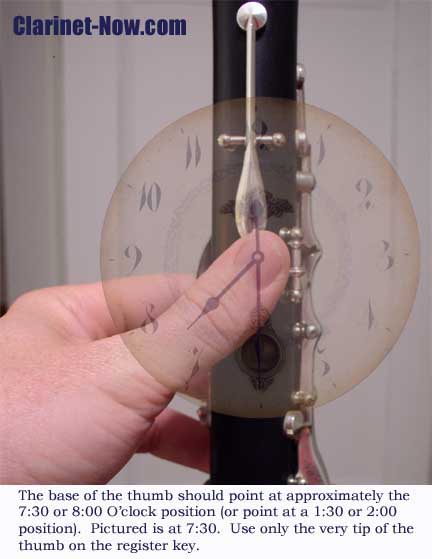
Clarinet Left Hand Position Thought #3. Left thumb at 7:30 or 8 O’clock position (pointed at 1:30 or 2 O’clock position).
Take a look at the back of your clarinet where the register key, thumb ring and tone hole are facing you. Now, place the left hand on the upper joint at the tone hole.
The base of the thumb should hold at roughly a 7:30 or 8:00 O’clock position (the tip of the thumb should point at the 1:30 or 2:00 O’clock position). The accompanying photo shows it at a 7:30 position.
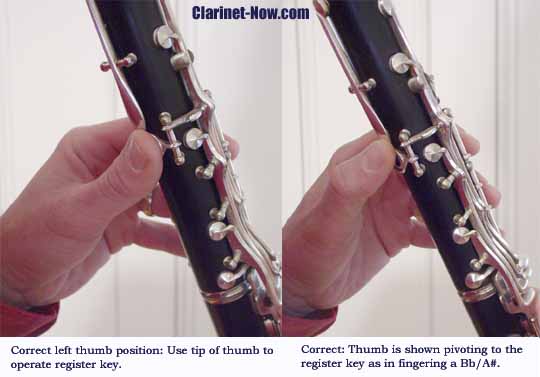
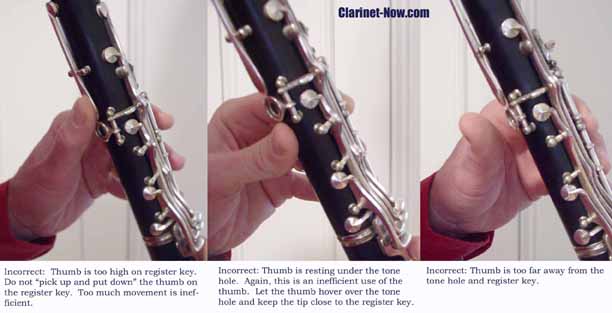
Clarinet Left Hand Position Thought #4. Efficient Thumb Use.
When not in use, the left thumb should hover over the thumb’s tone hole. The tip of thumb should touch the bottom tip of register key. Placing too much thumb on the register key is a common problem.
Make sure you use the left tip of the thumb to operate the register key. Pivot the thumb as you operate the register key. DO NOT pick up and put down the entire thumb on the register key.
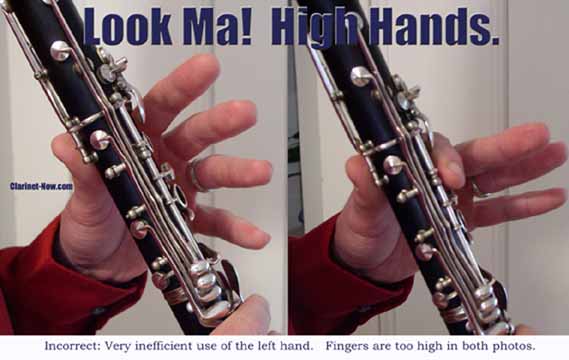
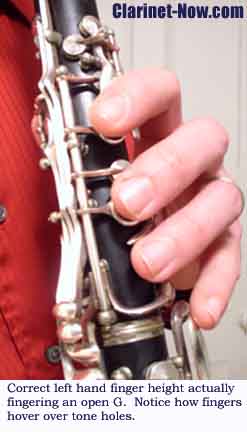
Clarinet Left Hand Position Thought #5. Watch your finger height (keep your fingers near their tone holes – do not wave at the audience while playing).
Allow your fingers to hug the clarinet as much as possible without changing the pitch (sometimes finger height can help adjust intonation and tone color. Experiment with this and use this at your discretion).
Let your fingers hover over the tones when not in the down position.
Many young students love to “show-off” for audience members by playing something really fast, and letting the audience know with a high “waving” finger technique. For many teachers, if you get the notes, finger height is not really an issue.
The more advanced you become as a clarinet player, the faster you will need to play. Playing fast doesn’t mean you can not play beautifully and with a fluid sound. While you are aiming for a gorgeous tone throughout your clarinet, remember the transitions between notes and registers need to sound fluid and not bumpy.
Yet here again, this is where technique meets musicality and vice versa. What is the use of making an expressive phrase if the technique is bumpy? If you play a fast passage and it's messy, is it musical?
Clarinet Left Hand Position Thought #6. Hug the G# and A keys at all times and watch left hand angle to the clarinet. See instructions under photos...

Have your left index finger “hug” the G# and A throat tone keys. WATCH OUT FOR LEFT WRIST MOVEMENT. Always keep your finger touching these keys (not depressing the keys, of course unless you need the A or G# tones). If you keep your hand always touching these keys, you have immediate access to them and therefore improving your throat tone technique.
Go get your Clarinet, Now! Try this: Play G# and A over and over like this G# A G# A G# A G# A G#
When playing these two notes, is your left wrist rotating? Are you moving your entire hand or arm? If you are, it is time for you to think about making this easier and more efficient for yourself.
You might think, “what is all the fuss about moving my wrist or not?”
Every little tip you gain from Clarinet-Now, any other website, live teachers, live master classes, recordings, anywhere, is another tip to make you better. Making your fingers efficient allows a cleaner, quicker clarinet technique and the fluid sound you develop makes better music.
How do you get to the top of Mount Everest? One step at a time.
How do you become a better clarinet player? One tip at a time.
Is it possible to play clarinet without moving the Left Wrist?
Watch the following video of Jacques Lancelot playing a movement of the Brahms Quintet. Take a good look at his clarinet left hand position as he does not move the wrist throughout the movement. The Master keeps his wrist steady, plays knuckles down, and sounds beautiful and smooth. This is our goal. What a model for us?
Set goals. Put a mirror on your stand and test your clarinet left hand position. Start slowly. If your wrist moves a lot, you’ve learned a bad habit. Breaking bad habits can be very hard at first, but eventually the control you have is worth all of the effort.
Now, let’s correct this. The rotation of your wrist is probably caused by the improper angle of your left wrist. If you look in a mirror, is your left hand holding the clarinet at a 90 degree angle?
If so, consider raising the wrist upwardly (towards the mouthpiece or sky, if you wish). Now, as you’ve done this, touch the G# and A keys (not depress them).
Try the two note exercise again: G# A G# A G# A G# A G#
Basically, hold down the G# key and only move the tip of the index finger to operate the A key. Get used to this and then start trying a few more exercises like:
Add G natural to the other two notes: G G# A Ab G G# A Ab G repeated
Add A#/Bb to the mix: G G# A Bb A Ab G repeated
As you practice your scales, music, band or orchestra parts or solos, do your best to keep a proper left hand position at all times. Do this whether you are fingering the throat tone notes or not.
Always have that left index finger touching (or as I often say, hugging the A and G# keys). Having your fingers ready to access those keys will massively improve your technique if practiced diligently.
And, you’ll make better music in the end.
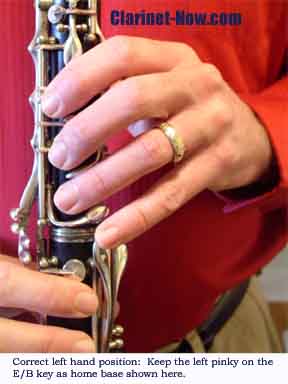
Clarinet Left Hand Position Thought #7. Home base for the left pinky is low E/long B key.
Use the left low E (B) key as home base for the pinky. Keep the pinky in this position until you need it for other pinky keys.
Here is an exercise to figure out your best and most efficient left hand position (go get it, go get your Clarinet, Now!):
Finger through these notes: low left E, low right F and low left F# in that order. Do this now. Is your left wrist rotating? If you have to raise your wrist to get to the low left F# key, your wrist is hanging down too far and probably not hugging the throat tone G# and A keys.
Be careful to NOT hold your left hand at a 90 degree angle from the clarinet (as discussed above). If you do this, your left index finger and hand will have to travel too far a distance to efficiently use the throat tone G# and A keys. Also, the extra motion in the wrist when operating the lowest notes of the clarinet is inefficient.
Clarinet Left Hand Position Thought #8. Do not look at your fingers while playing.
When you learn a new note, develop the sense of touch and add it to your sense of hearing. Finger/ear coordination comes very naturally if you do this from the beginning.
Looking down at the clarinet creates real embouchure problems and shows people that you do not know your fingerings.
Clarinet Left Hand Position Thought #9. Practice these left hand tips slowly.
Make yourself aware of inefficient motion. Make your fingers smooth, but also try to achieve smooth tone quality by having a solid, stable embouchure.
So, is that more than you ever wanted to know about Clarinet Left Hand Position? It's time to practice. Turn off the computer, and practice clarinet...
Or, come here and learn about the Clarinet Right Hand Position.
If you like the video, get the book here and work on page 4, measures 5-8 lower octave.
Greatest Left Hand tip everGet BBLoops for as little as $3.99
Fly Fast with the Greatest Left Hand tip everOne of the best left hand exercises for clarinet on BBLoops page 10 measures 1-8 on the above video.
