
Clarinet Right Hand Position
Free Clarinet Lesson #5
The correct clarinet right hand position will help you develop a faster, liquid, smooth technique. Technical efficiency in the fingers will help you create more musical passages. Kal Opperman says, “Playing the clarinet is from the knuckles down.”
What is your goal here? Read through the following thoughts. Pay attention to the common faults listed below.
Now, go find a mirror and let’s clean up your right hand technique to make smoother and more musical passages.
Old Glory Triumphant March
SGM (R) Christopher Jones Career Highlights
SGM(R) Chris Jones played clarinet with the West Point Band for 26-years. He can help you with improved chair placements, better site-reading, higher NYSMMA or solo and ensemble scores, honor band/college/military band auditions, and help adult players return to music. Schedule your free, trial lesson now.
Quick guide to CLARINET RIGHT HAND POSITION
1. Keep a natural, relaxed curvature of the hand.
2. Thumb rest should place over the top, right thumb knuckle joint.
3. Do not rest on the ring rod.
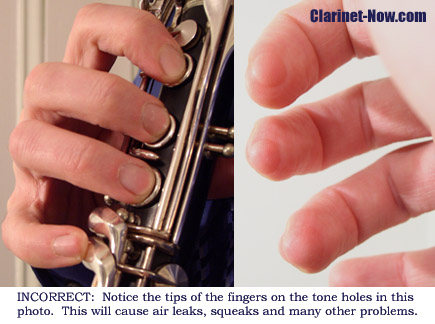
4. Use the pads of your fingers, not the tips.
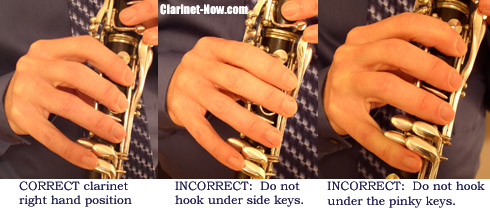
5. Do not hook under side keys.
6. Do not hook under the pinky keys.
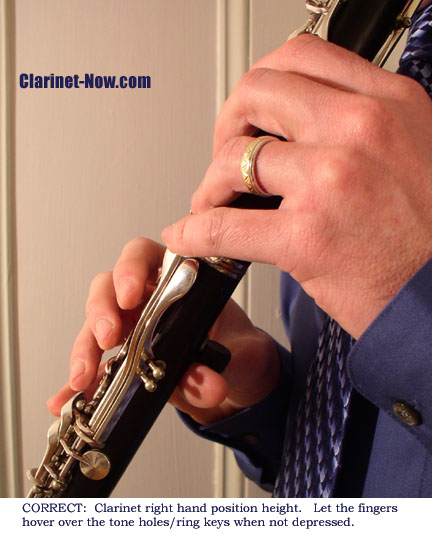
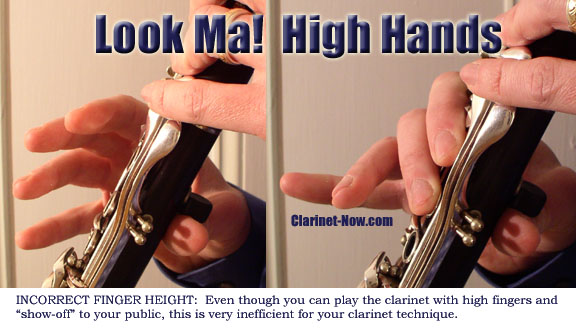
7. Keep fingers close to instrument (look Ma, High hands!).
8. Prevent right hand pain by taking proper rests while practicing.
You can not play the clarinet with one hand alone (unless it's a very limited piece of music), so read here about Clarinet Left Hand Position.
CLARINET RIGHT HAND POSITION THOUGHT #1
Keep a natural, relaxed curvature of right hand.
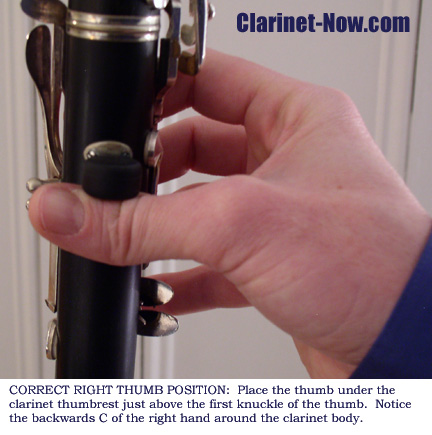
First of all, take note of the natural curvature of your hand. Stand up and hold the clarinet in your left hand. Drop the right hand to where it is hanging down naturally against your leg.
Now, bring the hand up to the clarinet and hold the natural curve. It should form a backwards C. Place the thumb under the thumbrest and the fingers on the three open tone holes (with ring keys).


CLARINET RIGHT HAND POSITION THOUGHT #2
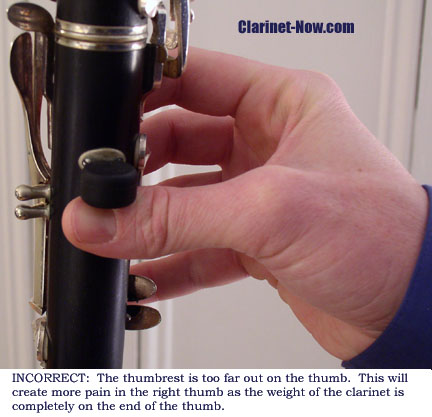
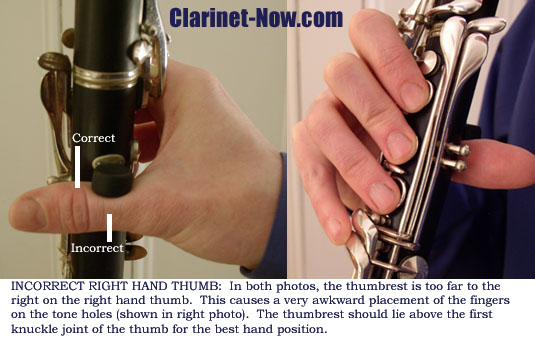
Thumb rest should place over the top thumb knuckle joint.
Generally, the right thumb should place under the thumb rest to hold the clarinet up. Put the thumb rest on the thumb at the top knuckle joint. Often a callus will form on the thumb here. Allow the curvature of the other fingers to cover the three open tone holes (with ring keys).
Every clarinet comes with a different thumbrest. Most have a metal piece sticking out behind the lower joint and under this piece is a small strip of cork to cushion your thumb. You can buy rubber thumbrests to slide over this metal outcropping that provide more comfort.
You can also purchase clarinet neckstraps to help bring weight off of your thumb and other metal and rubber contraptions exist to make clarinet playing more comfortable.
CLARINET RIGHT HAND POSITION THOUGHT #3
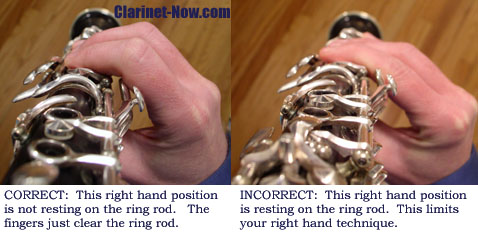
Do not rest on the ring rod.
As the ring keys have a rod to hold to the clarinet, do not allow the fingers to touch the rod and let them narrowly arch above the rod whether you are covering the tone holes or not. Do not rest your right hand on the rod. This results in less dexterity in right hand technique.
CLARINET RIGHT HAND POSITION THOUGHT #4
Use the pads of your fingers, not the tips.
If you use the tips of your fingers to play clarinet, it is highly possible that your fingers will not completely cover the tone holes. This creates air leaks at those tone holes which can add squeaks, airy sound and poor connections between notes among many other problems to your playing.
Take the fleshy part of your fingers and place them on the tone holes. Now, press down on the clarinet a little bit. Pick your fingers up and take a look at the pads of your fingers. Do you have nice round tone hole impressions on your fingers?
If you have full, round tone hole impressions on you fingers, you are in good shape as far as covering them well. If the impressions are on the tips of your fingers, you are not using your fingers efficiently to cover the holes. Air leaks, squeaks and bumpy connections between notes will occur.
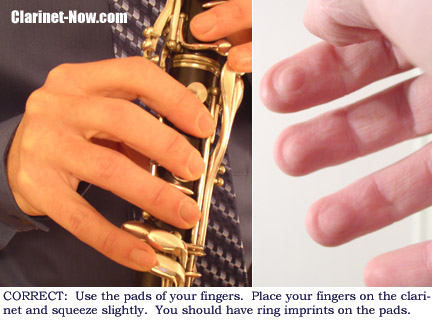
This little exercise is for demonstration only. Please, develop a light touch on your clarinet. Cover the tone holes efficiently and solidly, but do not place undue pressure on the instrument.
This is mostly for self-protection. If you put too much gravity into your fingers, you might develop overuse problems early. What is overuse? For the most part, it is pain.
What prevents overuse problems?
Practicing efficiently
Taking propers rests
Light, relaxed fingers
While practicing, keep a light touch. Listen for smooth connections between pitches. Do not allow hitches or breaks in the sound.
CLARINET RIGHT HAND POSITION THOUGHT #5
Do not hook under side keys.
One awful habit young players come up with to play clarinet is to hook your right hand under the side keys (the lowest one used to finger low Eb or clarion Bb). This is a very inefficient habit and not hard to break.
Speaking of these side keys, try to operate them with as little motion as possible. (Check this – does your right wrist rotate?<<< Say that three times fast).
CLARINET RIGHT HAND POSITION THOUGHT #6
Do not hook under the pinky keys.
One more horrible habit in young clarinet playing is hooking the pinky under the pinky keys. This is yet another poor habit that is easy to fix. The pinky commonly has the home base of right pinky on the right low F (clarion C) key. In left hand position, you also have a home base of pinky on the left low E (clarion B) key.
CLARINET RIGHT HAND POSITION THOUGHT #7
Keep fingers close to instrument (Look Ma! High hands).
Playing with “high hands” is a common inefficiency in young clarinet playing. Many like to “show-off” when playing concerts and give parents and audience members some sporting finger action. Make it your goal to have musically, efficient hands. Try to keep the fingers hovering as close over the tones holes as possible when, of course, not in the down position.
CLARINET RIGHT HAND POSITION THOUGHT #8
Prevent right hand pain by taking proper rests while practicing.
“One ounce of prevention is worth more than a pound of cure.”
Go from Clarinet Right Hand Position to Clarinet Left Hand Position.
Learn more about ClarinetNow Clarinet Lessons here.
Fly Fast on this videoIf you like the video, get the book here and work on page 4, measures 5-8 lower octave.
Greatest Left Hand tip everGet BBLoops for as little as $3.99
Fly Fast with the Greatest Left Hand tip everOne of the best left hand exercises for clarinet on BBLoops page 10 measures 1-8 on the above video.
